
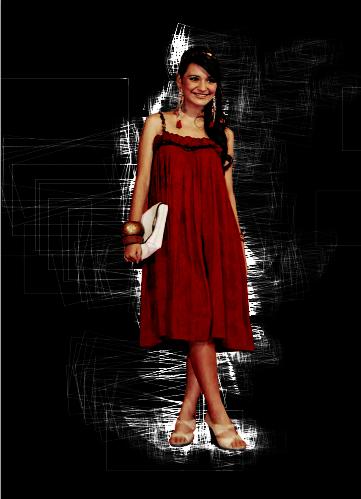
Photoshop beautiful light effect ,in pretty Shireen Sungkar picture


Create a new layer on top of the background layer, draw a rectangular shape on the canvas, then right-click it and choose “create work path”, after that right click again and choose stroke path , choose the option “Pencil” (Make sure you set the pencil size to be 1px, with a light white colour)

Now hide the background layer, go to Edit > Define Brush Preset and save the brushset


Step 3 

And paint away with this brushset on the texture layer around the girl edge, adjust the brush size for variations: 

Now duplicate the cloud layer a few more times . On each duplcated layer, hit Ctrl + T and right-click to choose the “Warp” option, warp the cloud to different shapes around the Shiren body: 

Change the blending mode of this black and white layer to “Overlay”, apply the following layer mask to it: 
Add aonther Vibrance adjustment layer on top of the duplicated layer: 
Create a new layer on top of every other layer and set the blending mode of it to “color”, grab a big soft brush with colour of your choice and simply paint on desired area. You will have the following effect: 
Step 6 

Final image

Tutorial Details
- Program : Photoshop
- Version : CS
- Difficulty : intermediate
- Estimated Completion Time: 1 hours
Step 1
Create a new document sized 800px X1200px and fill the background layer with Black colour. Load the Shiren Sunkar beautyful image into Photoshop and cut the girl out into our project.

Step 2
Create a new document (size doesn’t matter here) and fill the background with Black. Grab the Rectangular Tool as shown below:


Let apply this brushset to our image. Create a new layer under the original girl layer, click on the brush we just made, apply the following brush dynamic to it:
Shape Dynamics


Step 4
Create a new layer on top of the square shape texture layer called “cloud”, use the Lasso Tool with a 20px feather, draw a selection and render some cloud inside it, change the blending mode of this layer to “Colour Dodge”:


Step 5
On top of all previous layers, add a Black and White adjustment layer on the top:


Next simply merger flatten the image, duplicate the background layer once, and apply the following motion blur setting to the duplicated layer:

Change the blending mode of this motion blur layer to “linier dodge”
Here is my final effect for this tutorial:


