
CREATING GREEN FLORAL FASHION SHOOT
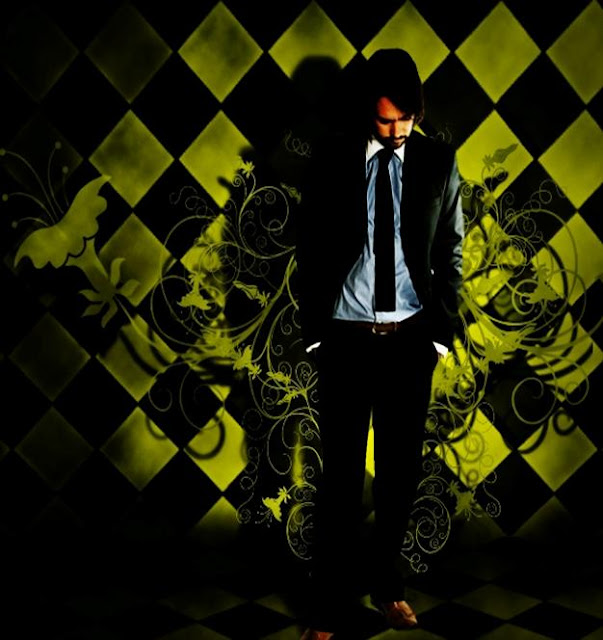
Final Image Preview

In this tutorial , we’ll make some froral fashion shoot in photoshop. This is a relatively simple technique .
Preparation
Tutorial Details
STEP 1


Make new Layer in top of background than put the Shape Style into the new layer ,


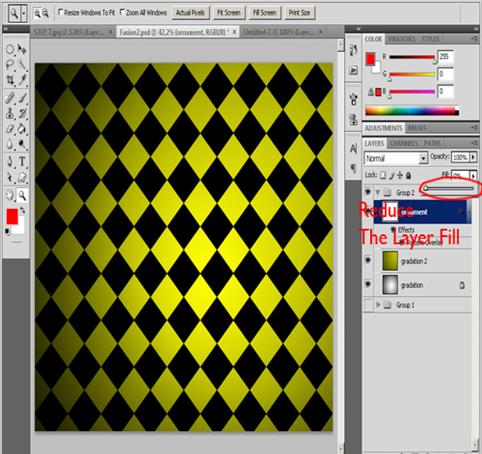
Next reduce the layer fill 0 % to show just the Pattern object , the layer will look like this


 Give the number of setting , mine is 30 pixel and click OK


 Than go to Edit > Free Tranform > Distort , than make the shadow fit , see the picture below


 STEP 27


 Final Result


Preparation
For this tutorial we’ll need Flower Bruses , you can download here .You’ll also need an image. In this tutorial I use man image from http://www.sxc.hu/photo/912668.
Tutorial Details
- Program: Photoshop
- Version: CS 4
- Difficulty: Beginner
- Estimated Completion Time: 45 Minutes
STEP 1
Make new project , mine is 1500 X 1300 pixel , name it fashion , next make a new Layer and name it gradation 1 . Pick a Radial Gradien tool , make sure the background color white and the foreground color is black by click Ctrl + D on keyboard . make a gradation like in the picture below.

STEP 2
Make a new Layer in the top of gradation 1 and give it name “ gradation 2 “ change the foreground color to # 535402 and the background color is default black , with that color make gradation from the right layer to the left layer and change the blending mode into hard light , you can see in the picture bellow.

STEP 3
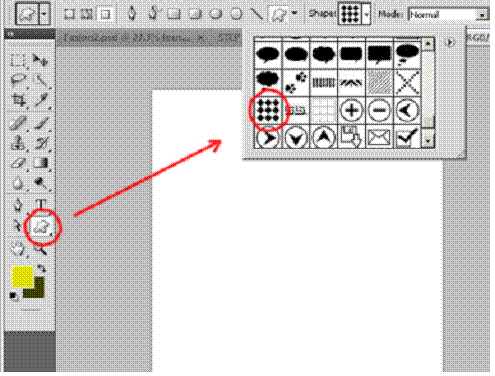
Now we will make a wall for the background , follow this couple step . Open new project ( File > New ) with size 500 X 500 pixel , than pick a Custom Shape Tools. Choose one of the style of Shape , see the picture bellow.

Next , hide the background by clicking Indicates Layer Visibility so there is just the ornamen .

Background are hidding

STEP 4
Go to Edit > Define Pattern to make the ornament became Pattern Style and name it ornament 1


STEP 5
On the fashion project , create a New Layer in the top of gradation 2 Layer , and name it ornament, click D on the keyboard to make sure the background color is white , than click Alt + Del to fill the Layer with white color.

STEP 6
Now click Layer > Layer Style on the menu bar than select Pattern Overlay to make ornament on the layer , see on the picture below.

STEP 7
Now pick the ornament Pattern that we have save , so the layer will influence with pattern ornament that we have made before.

Turn up the scale of Pattern so the ornament is not to small.


STEP 8
Right click on the ornament Layer Tumbnail and than select Convert to Smart Object .

Affer that go to Layer > Rasterize > Layer, to make Smart Object Layer became bacome Layer flexyble with Layer Style Effect.

STEP 9
Next step is , change the blending Layer into Overlay ,than go to Layer > Layer Style and give this Layer Style setting to the ornament Layer , here my setting for the layer , or you can have your own setting .


STEP 10
Now we will hide a couple of bottom part of the layer . pick Marquee tool select the bottom part of the layer

Click D on the keyboard to make sure the background and foreground color are default, and than click Ctrl + Shift + I to inverst the Marquee selection , than click add Layer Mask on Layer Pallette , So the bottom part of Layer will be hide.


Right click on the ornament Layer Pallette than select Duplicate Layer or you can click Ctrl +J on the keyboard , so the project are looks more darken.
STEP 11
Duplicate the Layer once again , name it floor, and change the blending into normal . bring it to bottom find a good position and delete a couple of part to make it fit with the wall .

STEP 12
Go to Edit > Tranform > Distort , than make the floor perspektif .


STEP 13


STEP 14
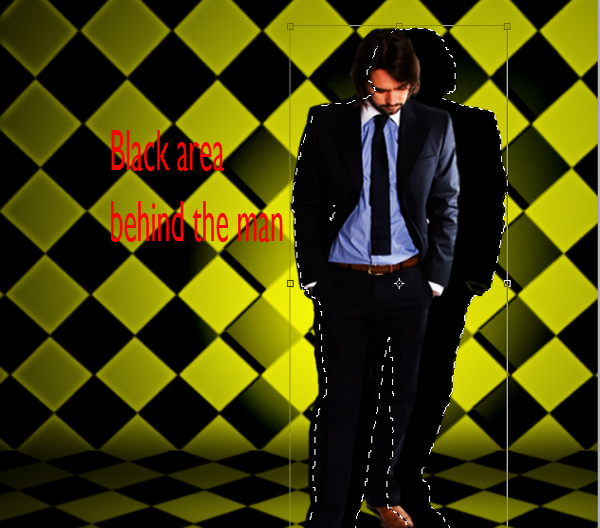
Open the man picture ,and select the white area with Magic Wand Tool , than click Ctrl + Shift + I to invers selection , that will make the man became selected and the white area became deselect


STEP 15
Drag the selection with the Move Tool to the fashion project , or you can click Ctrl + C on keyboard to copy the selected area and click Ctrl + V to paste into fashion project. After that go to Edit > Free Tranform or you can click CTRL + T and make the man fit with area

STEP 16
Use Eraser Tool to delete the rest of white area , or you can use Magic Wand once again ( select white area and click del on keyboard ), note : hold Shift on keyboard while selection another white area with Magic Wand Tool.


STEP 17
Duplicate man Layer and Change Blending mode into Overlay . now the man picture will more darken.

STEP 18
Now we will make shadow for the man. Hold Ctrl key on keyboard and click man Layer Tumbnail on layer pallette, so the man body will selected.


STEP 19
Make new Layer under the man layer , and name it man shadow, make sure the background and foreground color are default , click D on keyboard , and than click Alt + Delt on keyboard to fill the selected area with black color, than click D on keyboard to deselect the area.
STEP 20
Go to Edit > Free Tranform or CTRL + T on keyboard , bring the shadow couple step behind the man and make it fit with the background. Next pick Marquee tool and select the leght shadow but not all of leght shadow .

STEP 21
Reduce the opacity of shadow ,than go to Filter > Blur> Gussian Blur , set the radius to 7 pixel than click OK
STEP 22
Load the flower brush that you have download ( Brush > Load Brush >> find location you save the brush > click OK )


STEP 23
Create a new Layer under the man Layer , name it flower , Set the foreground color to #aeae05, and use the flower brush to make floral variation behind the man ( Look at the picture ) , you may need to variate the brush diameter and little bit play with brush angel . To do that click F5 on keyboard and set it.


STEP 24
Click Layer Tumbnail on the Layer Flower Pallette , so the flower variation that we had made is selected , make New Layer under Layer flower and name it shadow 1 and fill the selected area with black color or click Alt + Del on keyboard.

STEP 25
Go to Edit > Free Tranform or Ctrl + T on keyboard , and make the shadow fit with area , than go to Filter > Blur > Gussian Blur , give setting 4 pixel and click OK .

STEP 26
Duplicate layer flower ( Ctrl +J ) on keyboard and name it Flower 2 , go to Edit > Free Tranform ( Ctrl +T on keyboard ) ,than right click on Free Tranform field and select flip horisontal . After that places like on picture below.

Duplicate layer shadow 1 ( Ctrl +J ) on keyboard and name it shadow 2 , go to Edit > Free Tranform ( Ctrl +T on keyboard ) ,than right click on Free Tranform field and select flip horisontal . After that places like on picture below.

STEP 28
Create new Layer on top , name it claud , than set the foreground color to #b5b802 and the background color to # 000000 , next go to Filter > Render > Claud , than cange the layer blending mode into overlay .

STEP 29
The last step is , create new Layer again on top and name it Lens correction , fill it with white color . then go to Filter > Distort > Lens Correction . Use setting like in the picture bellow and click OK. Next , change the blending Layer into Linier Burn and reduce the oppocity to 50%.


Here the final result without gradation 2


